|
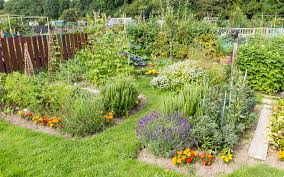
Potager gardens (pronounced poe-ta-zhay), or ornamental vegetable/kitchen gardens, have been around for a long time, but the concept is relatively new in the United States. Potager gardens have been mostly planted in Europe with its origination in France developed by the monks in the 16th century. Potager Photo Credit What makes it different from regular vegetable gardens? It’s the design concept. It is a small-scale form of vegetable growing with a blend of herbs, vegetables, fruits and edible flowers grown together but structured with a design based on repetitive geometric patterns rather than the more traditional rows or blocks of gardening. Potager gardens are grown to provide interest in all four seasons. Some potager gardens have focal points, such as a tree, fountain, or a large pot of herbs. Many plants are trained to grow up on trellises or next to a house or edged in amongst evergreens. The gardens include flowers or small fruits. There are some great examples/photos of potager gardening at the blogsite “Chicago Now“. Before building your own potager garden, there are some things you’ll want to consider, such as (1) what kinds of foods your family will eat and how much you’ll use; (2) staggering plants for 4 seasons so you don’t have patches that are bare; (3) locating a sunny spot where veggies can bask in the sun; and (4) sketch out your garden. Plants to consider in your potager garden:
0 Comments
As a gardener, it’s a wonderful feeling seeing my fridge filled with red tomatoes, colorful peppers, deep green zucchini and cucumbers; and there’s nothing more discouraging than opening my fridge several days later to see my tomatoes rotting, lettuce wilting, and cucumbers mushy. Some vegetables and fruits emit ethylene gases that will actually make your other fruits and vegetables spoil faster. So how you store your fruits and vegetables will determine how fresh your produce will stay. After spending so much time growing my fruits and veggies, I want to keep them healthy, crispy, and lasting long. How? Some people suggest using this product…But at $10+ a pop for 20 bags? Ouch! That’s pretty steep! I know they work, but I have a hard time choking down that kind of money. So here’s my solution and it works wonders! I’ve been doing this for quite a while…long before the Green Bags came out…and it’s much cheaper! By using Ziploc bags, Hefty, or something equivalent, you can get the same results. Walmart sells Ziploc 50 count quart-size bags for about $4–that’s more than double the bags and half the cost of what you’d get with the other product. Ziploc 28 count 1-gallon Sandwich Bags runs about $3. And the jumbo 10 count 2-gallon size bags are $3.50. Here’s what you do to get the most bang for your buck and less spoilage: First, take a storage bag large enough to accommodate the vegetable(s) you are going to store. Bend the bag in half and with scissors, cut three small slits across the width of the bag, like so: cut 3 small slits across the width of the bag Second, do NOT put “wet” vegetables into a bag. Dry them off before you store. The easiest way to do that is using paper towels. Third, store like vegetables together, i.e., tomatoes in one bag, lettuce in another bag, and so forth. Lastly, put the vegetables or fruits in the bags and store in your fridge! The slits allow the ethylene gas to escape and air in to keep the vegetables crisp. The plastic keeps the vegetables away from each other to help keep the gasses from spoiling the other foods. That’s it! It’s fast, easy, cheap, and simple. I’ve had many of my vegetables store up to 30 days! Let me know how it works for you. 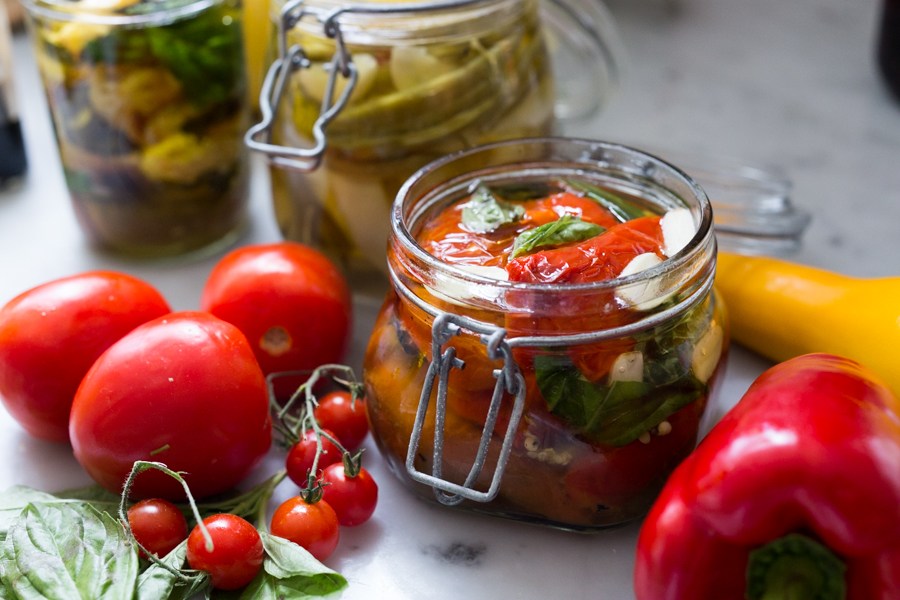 Pollinators (or winged visitors) are essential to successful gardening. They are a necessity for the survival of plants and bounteous crops. I was thus honored to attend David Salman’s lecture on inviting birds, bees and butterflies in our gardens through beautiful plantings of perennials, ornamental grasses. I also got to pick his brain over lunch with fellow gardening experts from the Conservation Garden Park who sponsored David. David is Founder, CEO and Owner of Santa Fe Greenhouses, and he is the Chief Horticulturalist of High Country Gardens. David is an expert on waterwise (xeric) plants for western landscapes and blogs about it at The Xeric Center. He is also the recipient of the distinguished “American Horticultural Society 2008 Great American Gardeners Award”. To David’s credit, he has written two in-house publications “Waterwise Garden Care” and “Spectacular Seasons of Color“, plus a myriad of videos found on YouTube. So you can see why I was excited to not only meet him, but to glean some knowledge from his expertise. I always like to ask gardening experts how they got interested in gardening and horticulture and so I posed the same question to David. He said when he was young, he used to collect caterpillars and try to figure out what they liked to eat and what plants they liked to visit. He’d raise them until they became butterflies or moths. It reminded me of my daughter who felt sorry for worms stuck on the pavement after a heavy rain. She brought them home, put them in dirt and kept them alive for months by watering the soil. After a couple of them died, she put them back in the garden soil. During David’s lecture, he stressed having a healthy gardening environment for the pollinators. Having pollinators (birds, bees, and butterflies) in your garden is indicative of a healthy environment. They help reproduce plants and set the fruits. Our planet is run by plants and so by inviting these special winged visitors into our gardens, we are doing our part in building a healthy environment. Here are some suggestions David gave in his lecture to invite winged pollinators to our gardens: Provide Food, Water and Shelter We can make our garden an inviting place for winged visitors by providing food, water and shelter; these are basic elements in bringing pollinators into the garden. Hummingbirds need moving water from a fountain or dripping source. They won’t go to still water. (I didn’t know this.) Song birds also need clean water–moving or still. He suggested making a low spot in the soil that collects water as butterflies are attracted to mud puddles.  Garden Organically
By gardening organically, we invite winged visitors to our garden. We can do this by preparing our soil and maintaining the soil fertility with natural and organic compost and fertilizers. He said “We wouldn’t throw salt in our gardens–we know that isn’t healthy–and yet we cover our gardens and feed our plants with chemicals that make our gardens and our environments sick. Using such chemicals keep the pollinators away that keep our gardens healthy.” Pesticides are toxic to pollinating insects and animals. There are definite options that are environmentally friendly and organic to keep our gardens fruitful and healthy. A couple of organic pesticides that are environmentally friendly:
Provide Nesting Sites Everybody needs a home and another way to invite winged visitors is providing nesting sites. By leaving unmulched, bare soil you invite burrowing solitary bees and bumble bees. David suggested leaving herbaceous plants standing and not cutting back the garden before winter so beneficial insects, butterflies and moth pupae have a place to over winter. He also suggested providing nesting tubes for solitary bees (like Mason bees). Plant a Diversity of Plants By planting a lot of different flowering plants and grasses in your garden, you’ll provide nectar for pollinators and food for insect larvae (like caterpillars and seeds for songbirds). He suggested planting more than one of each perennial and ornamental grasses and planting them in multiples to give a better visual impact and to make it much more efficient for pollinators to stay in the yard. (This is one area that I fail. I do plant annuals in multiples, but my perennials are mono-planted throughout the garden.) David went on to list many bulbs, grasses, and blooming perennials that are waterwise and which attract pollinators. Most of these are listed in their catalog at High Country Gardens. Invite pollinators into your garden and enjoy the fruits of their labors with healthy plants and a bounteous crop! I discovered cleome while visiting the gardens at Temple Square and fell in love with it’s feathery, airy appeal. Because of its originality, I decided to show case this lovely plant in my own garden, which sparks a lot of discussion by passersby. Native to Argentina, Paraguay, Uruguay and southeast Brazil, Cleome hassleriana is commonly known as the spider flower or spider plant because of its spidery-like flowers with long-stemmed stamens and wavy seed pods. The blossoms look more like a feathery, airy snowball with a 6 to 8-inch span on long, sturdy stems that do not need staking. Like sweet alyssum, the cleome will often reseed itself and will lie dormant until spring. Although the plant is not invasive, it can overtake other plants if it is allowed to go to seed. As it grows taller, the plant can look leggy and leafless, so try planting it en masse or with other flowers placed in front of it. Cleome is a very drought-tolerant, heat-tolerant plant, so it does well in my Utah environment; however it looks more attractive if it is watered regularly. To deadhead cleome, use pruning shears to cut off the flower head down to where another bud appears as a small bump along the stem. Genus: Cleome (klee-HO-me) Family: Cleomaceae Species: Cleome hassleriana Category: Annual Habit: Upright Height: 24-48 inches (61-122 cm) some can get as tall as 5 feet! Spacing: 20-24 inches (51-61 cm) Bloom Color: Pink, Lavender, White Bloom Time: June to October Hardiness: USDA Zones 8-11. Hardy to 25 degrees Fahrenheit (-4 Celcius) Sun Exposure: Full sun to part shade Foliage: Herbaceous, Smooth-textured Soil: 6.1 to 6.5 (mildly acidic) 6.6 to 7.5 (neutral) 7.6 to 7.8 (mildly alkaline) Propagation Method: From seed; direct sow outdoors in fall after last frost Seed Collecting: Allow seed heads to dry on plants; remove and collect seeds Watering: Average water; water regularly; do not over water 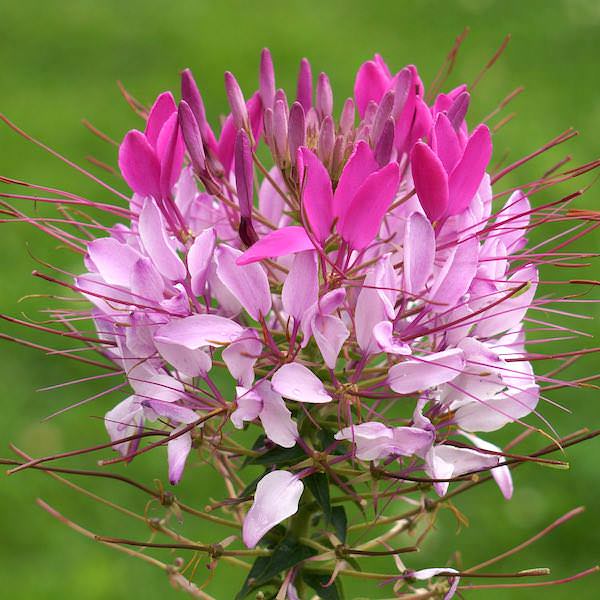 Garden Designs Beth believes the best gardens satisfy the eyes and blend with their surroundings. She will work with you to create a garden that reflects your ideas and inspirations, starting with key objectives like how your outdoor space is used and how much time you can devote to maintaining the new garden. These key objectives create a sound foundation to evaluate the site, design the garden’s layout and create the best plant collection for your needs. Beth will discuss bloom sequence, color schemes, foliage, form and texture with you as your new garden plan takes shape. Beth prides herself on offering her clients extended seasons within which to enjoy their garden. Gardens which always offer a seasonal show through bud, bloom, bark, berries or branches is key to enjoying your garden from winter through the active growing seasons and fall’s chill. Ask her to install your garden plan in full -- or to use the comprehensive design as a master plan to execute over the course of many seasons. Beth can also help you gracefully rejuvenate your existing garden, whether it’s inherited or just in need of tender loving care, then show you how to maintain it for ongoing enjoyment. 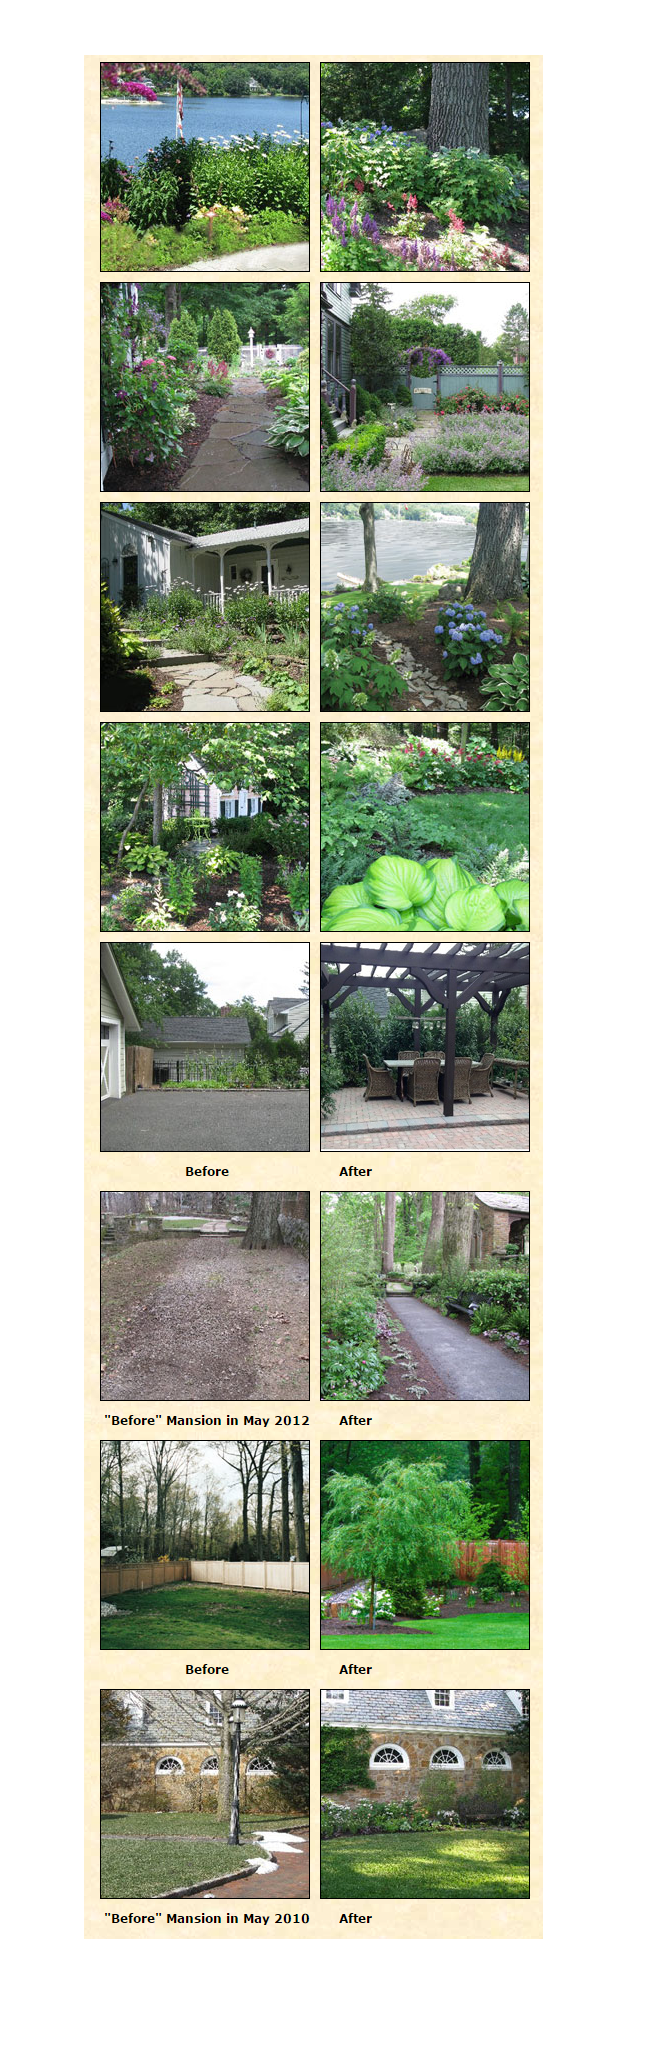 Gardening in Containers Container plantings can accent an existing garden, dress up a doorway, or be used to create an entire garden or terrace. They can fill bare spots in the sunny garden with a burst of color or lighten a shady garden with variegated foliage. Potted gardens offer all gardeners versatility and portability. Ask Beth to recommend the perfect containers and plants -- and let her put them together into original designs just for you. 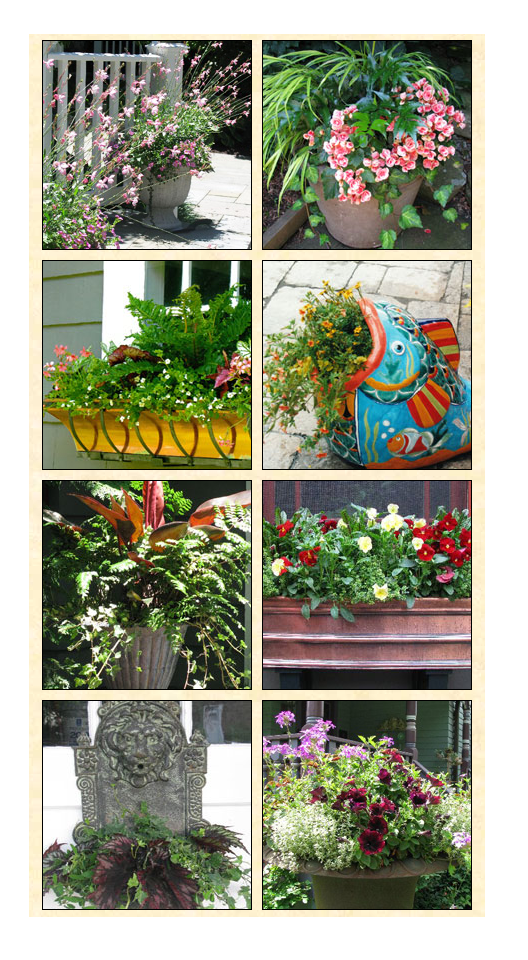 Nurturing your Garden
All gardens need ongoing attention for long-lasting health. The garden design can only be as good as the nurturing it receives. Beth follows up her design and installation with one-on-one training on how to maintain your beautiful new garden, including seasonal timetables for tasks. She’s delighted to work with you, whether you’re already a green thumb or a new gardener. She also returns the following year to see how your garden is growing and tend to plants needing extra attention. Caring for your own garden can reward you throughout the year. If you prefer, The Potted Garden will also gladly maintain your garden for you. Step by Step Here is the comprehensive process Beth follows to create your garden. Step 1: Consultation. Discussion about your garden objectives and requirements – Beth encourages you to share information that has inspired you: photos of a friend's garden or articles and pictures from magazines. Step 2: Site Visit. Review your proposed garden site in conjunction with its surrounding environment: buildings, hardscapes, and existing gardens. Step 3: Site Analysis. Evaluation of your existing site in terms of soil, light, drainage, other environmental factors. Step 4: Garden Design. The design plan is reviewed with you. This master plan includes: the design, plant lists, a photo library of each plant recommended for your collection, soils assessment, irrigation and rodent control recommendations, plus a project estimate. Step 5: Your Review & Approval. Step 6: Garden Preparation, Layout & Installation. All procurement and plant selection is personally completed for you by Beth. Garden footprints are cleared, soils amended, plants laid out according to the design and installation is completed. Step 7: Personalized Maintenance Review. A customized maintenance package, including hands-on review for each plant in the landscape, is created for each client. This easy-to-use document details feeding, pruning and general care. Step 8: Seasonal & Post-Season Review. Visits to your new garden site to check on your garden’s health and answer any questions you may have. |
Willie T. KornegayGarden Stems is an online gardening resource to annuals, perennials, roses, trees, shrubs, and more, including useful tips from lay and professional gardeners. Garden Stems is an educational tool with beautiful images and introductions to some of the most leading plants in the market. Garden Stems is your gardening professional to create beautiful gardens with confidence--one plant at a time. ArchivesCategories |
 RSS Feed
